Data Import/Export allows you to import and export user information to and from VolunteerHub in unformatted CSV files. This article covers the following topics:
TABLE OF CONTENTS
Please note that Data Import/Export is included with all Enterprise Plan sites and may be added to other VolunteerHub plans at an additional cost. For more information, please contact clientsuccess@volunteerhub.com.
Setting Import/Export Keys
Before you can import or export VolunteerHub data using Data Import/Export, you must tell the system which sets of data to import or export. This is done through the use of "import/export keys." Import/export keys are special identifiers in VolunteerHub that tell the system the user form question or user group you're editing is able to receive imported data.
You can set an import/export key for any question in the User Form as well as any user group. By default, no import/export keys are set, so only your users' usernames will be imported/exported until you set keys for other questions in the User Form and any user groups you'd like to import users directly into.
To set an import/export key for a specific set of user data (i.e., a specific question from the User Form), follow the steps below.
Step 1.
Log in to your Hub and navigate to your User Form. From there, click on the ellipsis (...) button beside the question you'd like to import/export responses to or from and select "Edit Question" from the menu that appears.
Step 2.
Towards the bottom of the form, you will find the Import/Export Key field (Figure 1). Enter your import/export key in the field provided. Most times, you will enter the name of the question in this area without spaces. For example, if you would like to import volunteers' names into VolunteerHub, you might edit the "Full Name" question in your User Form and enter "Name" into the Import/Export Key field.
Note that import/export keys must begin with a letter and may not contain spaces; if your key needs to contain more than one word, try capitalizing each word and omitting the spaces (e.g., "EmergencyContactName").

Figure 1. Enter the exact name of the identifier you'd like to use as an import/export key.
Step 3.
When finished, click on the Save button. Repeat these steps for each question in the User Form for which you'd like to import or export data.
Step 4.
Determine whether you want to import users into the system with specific user group memberships. You can do this by defining import/export keys for specific user groups, which will allow you to import or export user group memberships. To set an import/export key for a particular user group, go to the User Groups page.
Step 5.
From there, select the user group you'd like to set an import/export key for and click on Edit to enter the 'User Group Details' window.
Step 6.
Just as you did when editing each User Form question, towards to the bottom of the page, enter an import/export key into the Import/Export Key field. When finished, click on the Save button (Figure 2).
You will only be able to import or export users into user groups for which you have set import/export keys.
Once you've defined all import/export keys for all User Form questions and user groups you want to import data into, you can begin importing and exporting users.

Figure 2. You can also add import/export keys for a user group by editing the desired group.
Importing User Data
The Import Users feature in VolunteerHub allows you to import volunteer information, such as usernames, contact information and group memberships, quickly into VolunteerHub via CSV file. Once you've set your import/export keys for the desired User Form questions and user groups, you will be able to import that data into VolunteerHub using the Import Wizard.
Follow the steps below to import user data into VolunteerHub. Be sure you completed the steps above in the section on Setting Import/Export Keys FIRST before attempting to import users into the system.
Step 1.
Navigate to the Import Users page to access the Import Wizard (Figure 3).
 Figure 3. The Import/Export are tiles in the Main Menu.
Step 2.
If you already have a CSV file containing the data you'd like to import (such as an exported volunteer roster from your previous volunteer system), click on the Download Template button to download an Excel spreadsheet containing columns that represent the import/export keys defined in your Hub's User Form questions and user groups, and replace the headers in your existing spreadsheet with the headers in the template (Figure 4). The headers must match the template for the data to import correctly into VolunteerHub.
In addition, your CSV file must contain at least the Username:Value and Email Opt-in:Value columns in order to import successfully, though the recommended minimum would be Username, Email Opt-in, & Email Address. This would ensure an account is created, and the user is sent an email to fill out the remainder of your user form.
If you do not have an excel file of your existing users, you can also manually populate the template with your volunteers' information.
The following MUST be true for any users you import into the system (DO NOT SKIP THIS STEP):
- Username must be present. If you are planning to invite imported users to your site, this username will be temporary and can be changed by the user. In addition, all usernames must be unique. If you import a user with the same username as an existing user in VolunteerHub, the previous user's account will be overwritten with the imported values - this action cannot be undone! We recommend using importeduser1, importeduser2, etc.
- Email Opt-in must contain either "True" or "False" for every user. Inputting "True" for this field opts the user into administrator-generated emails such as announcements and newsletters. Volunteers can change the response to this question from their Notification Settings page.
- Email addresses must have the "@" symbol and a URL extension (e.g., ".com") at the end. Emails cannot contain spaces.
- Phone numbers must contain at a minimum ten digits (US/Canada only).
- Names must contain both a first name and last name. (And if your organization also requires users to provide a Title, you must include a Title.)
- Addresses must contain data for all fields if data is entered into one or more address fields (e.g., if you enter a street address, you must enter city, state and ZIP as well; if you enter a state, you must enter data into the Address1, City and ZIP fields). In addition, the ZIP (or Postal Code) must contain the proper number of digits and the state must be a two-letter abbreviation (US only). If you are importing data into the Address1 column, do not remove the Address2 column (even if the cells in that column are left blank).
- True/False (Boolean) question fields must contain either "True" or "False" for every user. These cells cannot be left blank for any user.
- List question fields must contain a value you have defined in the "Value" field of the user form question's List Items (do not use options entered into the "Text" column unless they match exactly what you have as the list item's Value). Values are case-sensitive. These cells cannot be left blank for any user.
- Number (Integer) question fields must contain an integer (whole number) within the Minimum and Maximum Accepted Values you have specified in the user form question.
- User Group membership (:IsMember) columns must contain either "True" or "False," indicating whether the user is a member of each group for which an Import/Export Key is defined. These cells cannot be left blank for any user.
In addition, any non-required columns you do not wish to import data into should be left blank or deleted in their entirety (or, remove the Import/Export Key from that column's corresponding User Form question or User Group). In other words, either leave the entire column as-is, or delete the entire column by right-clicking the column letter and choosing "Delete"; do not just delete the contents of the header cell. Deleting only the header name or only specific header cells from the template will result in the following error during import: "Header'' is improperly formatted."

Figure 4. Compare your CSV file with the downloadable CSV template to ensure your data imports correctly.
Step 3.
Once your headers match the template file and your data is complete and correct, begin importing your CSV file by clicking on the Browse button (see Figure 4 above) and selecting the CSV file you'd like to import.
Step 4.
If you would like to invite the imported users to start signing up for events in your site, check the "Send email invitations to new users" checkbox to send an email invitation to your imported users (Figure 5). You may include a custom message to your imported users in the text box provided. The users will receive an email with a link to your site; upon clicking the invitation link, those users will be able to create a username and password and complete their profile (the user form will pre-populate with all data imported for that user).
IMPORTANT: If you want to send them, invitations must be sent during the import process. You will not be able to send the invitations at a later time after importing users. Skipping this step will import user accounts with no passwords, meaning an imported user will not be able to log into their account unless they click the "Forgot password?" link in the Sign In page AND also have a unique email address in their imported account (Forgot Password does not work for users who share an email address with any other users). You cannot import passwords for users as this is a security concern.
 Figure 5. An email invitation can be sent to all imported users (optional).
Step 5.
Click on the Import button at the top to import the file. The user information in that file will be available in your VolunteerHub site immediately once the file is imported successfully.
When importing large numbers of volunteers into the system, you can view a live count of the number of users who have been imported into the system. At any time, you can navigate away from the page to continue working in your site. To check on the progress of the import, simply return to the Import Wizard.
The import functions on a queue. If you see the word "Queued" for a period of time, that means another site is running an import and your import has been added to the queue. When this happens, just click navigate away and continue your work in the system as needed. You can return to the Import page any time to see the progress. Once your import is queued up, you'll see that users were imported.
Step 6.
Upon completion of the import process, a results page will display with the number of users imported as well as the number of rows not imported due to import errors (Figure 6). Click on the "Download the errors file" link to view a CSV file detailing the issues with the spreadsheet.
The errors spreadsheet will provide the cause of the error as well as the corresponding line number of the original import file.
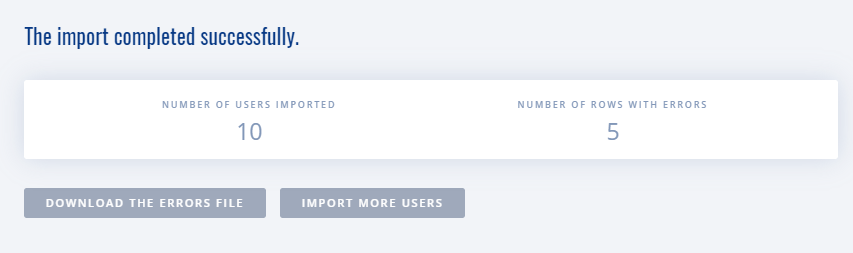
Figure 6. You can view the results and download a detailed error file once your import is finished.
Step 7.
Correct the reported errors, if any, and delete the first two columns (A and B) from the file. Then, save the spreadsheet as a CSV file on your computer and use it as a new import file to import the remaining users into the system.
Exporting User Data
The Export Users feature in VolunteerHub allows you to export volunteer information from VolunteerHub as an unformatted CSV file.
Follow the steps below to export user data from VolunteerHub.
Step 1.
From the main menu, navigate to Export Users.

Figure 7. Export user data using the Export Users module.
Step 2.
Choose whether to export all users or members of a specific user group (Figure 7). For the latter, simply start typing the name of one of your user groups into the field in the first statement, then select the best match from the list of matches below the field.
Step 3.
Click on the date field to export only those users that were added or changed after that specific date. Leave the field blank to export all users from your VolunteerHub site.
Step 4.
When finished, click on the Download CSV File button to export the full CSV file based on your selections. You can then manually import this file into a CRM or other application or use the data for mail merges, email blasts, etc.